Tutorial for foldover elastic
These tutorials are brought to you by Catharine of Chloe Toes Boutique – thanks Catharine!
The use of fold-over elastic binding (FOE) is what makes the Chloe Toes diaper pattern uniquely quick and easy to sew, as well as being an attractive and comfortable finish which functions well to contain leaks and messes.
I recommend using only the heavier weight, plush finish (not satin finish) 1″ wide diaper FOE. Narrower widths do not adequately enclose the layers of the diaper and thinner, shiny satin fashion FOEs are not heavy-duty enough to perform well for diaper products. They tend to snag, fade and wear out under harsh diaper washing conditions. Diaper FOE may be purchased in the notions section of our store, or from numerous places online. White FOE may be dyed various colors using RIT dye. Be sure to prewash and PRESHRINK all FOE before applying since it does shrink.
At first, you may find sewing on FOE to be a bit tricky, especially when applying it around curves and when stretching to gather at leg openings and waistlines. However, with practice, I am confident that you will soon come to appreciate the speed and ease with which FOE can be applied in a single step, eliminating the need for sewing on elastic in a separate step and for turning and topstitching or applying separate bindings or serge-finishing diapers. Diapers constructed with FOE do not require a serger and can be made on any basic sewing machine which allows for both a straight and zig-zag stitch.
FOE How-To
The following photos illustrate the application of FOE to a traditional style Chloe Toes all-in-one (AIO) diaper. The diaper has several absorbent layers with a sewn-in soaker inside and a layer of waterproof polyurethane laminate fabric (PUL) on the outside. To facilitate applying the FOE binding, I have zig-zagged all around the absorbent layers of the diaper, to keep them from shifting and compress them a bit for ease of binding. I do not stitch through the PUL layer, as I do not want to puncture extra holes in it, which might promote leaking. Instead, I have used a washable children's school glue stick to temporarily 'baste' the PUL layer to the outside of the absorbent diaper body before applying the FOE. The technique for binding a fitted diaper is exactly the same. Binding a pocket diaper, differs only slightly, involving an additional step to create the pocket opening at the back (see pocket training pants assembly for an illustration of how to create the pocket opening).
*******************************************
The photo below shows the diaper with absorbent layers sewn together and PUL outer basted on, ready for binding. I always apply FOE with the right side of the diaper facing up. I have transferred the markings for gathering the top front, top back and leg openings to the outside of the diaper, using a washable marking pen.
You should also transfer all markings for snap placement prior to binding. Snap stud placement should be marked on the outside of the diaper and snap socket placement marked on the inside of the diaper.

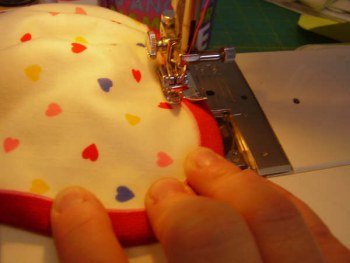
I suggest binding the top back of the diaper first. Begin at the end of one wing. Leave 1″ of FOE extending beyond the end of the wing. Lay the diaper on top of the FOE binding, positioning the edge of the diaper fabric right at the crease.

Fold the elastic binding over, enclosing the entire raw edge. Make sure the raw edge is pushed all the way to the center of the FOE. Using a three-step zig-zag stitch (or wide zig-zag if you do not have a three-step zig-zag) begin stitching down the FOE.
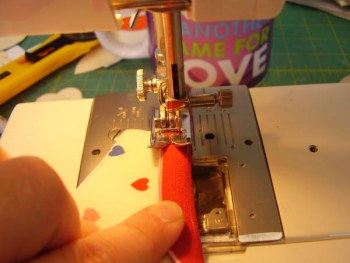
Use both hands to help hold the FOE in place and frequently check the position of the fabric, making sure it is at the center of the FOE.

Line up your stitching so that the innermost stitch of the zig-zag will fall right at (or just barely over) the innermost edge of the FOE. This prevents the FOE from curling up at the edges (esp. in curved areas).
Any time you stop stitching, always stop with the needle down in the fabric, in the innermost position. This will help prevent the diaper fabric and binding from shifting, even when you lift the presser foot.
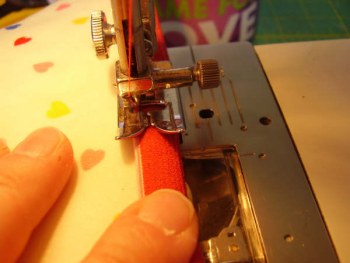
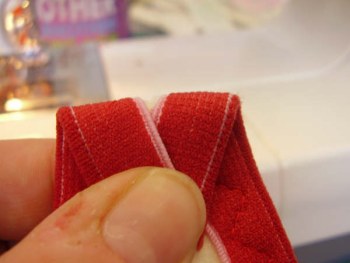
When applying FOE to areas which must be gathered, such as the front and back waist and the leg openings, you will want to proceed slowly, stopping often (always stop w/ needle down) to rearrange your fabric and FOE, and to reposition your hands so that you have good control over the fabric and binding. Stretch the FOE. Sew a few inches. Stop. Stretch FOE some more. Reposition hands. Sew some more. Etc. You can see by the color of the FOE in this photo that it is being stretched.

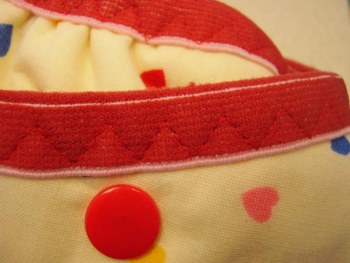
Depending on the thickness and stiffness of the diaper you are binding, you may need to adjust how tightly you pull the FOE. In general, I pull the FOE quite taut (not to the max, but stretching firmly) for fitted and AIO diapers and stretch more moderately (60-75% of max) when binding a pocket diaper or diaper cover. When relaxed, the FOE should gather the diaper edge gently, as in the photo below. This photo also illustrates stitching close to the inner edge of the foe.

The next photo shows the diaper with the back binding applied. The Chloe Toes diaper is bound with two separate pieces of FOE; one applied along the top back and one applied continuously from wing to wing, going around the leg openings and diaper front.
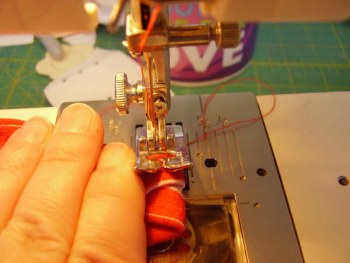
Apply the second binding strip in the same manner as the first. Begin by laying the foe down, leaving 1″ of FOE extending beyond the end of the wing.

Fold the FOE to enclose the raw edge of the diaper and stitch, again using a three-step zig-zag or wide zig-zag. Straight areas are easy. Just don't stretch the FOE in areas which are not meant to be gathered. If you do, these areas will curl instead of laying flat.

Applying FOE around curves can be challenging. Remember to work in small segments, stopping often (with needle down) to reposition your hands to hold everything in position. Lifting the presser foot may be useful to view the FOE edge better and to ensure that the fabric edge is all the way to the center of the FOE.

Try not to stretch the FOE when curving around the front wings or they will tend to curl at the edges.
Leave a bit of FOE extending beyond the diaper edge at the end of each diaper wing.

Once I have completed this step, I fold the diaper in half lengthwise, in order to compare the two sides of the diaper. Fold the diaper in half, carefully lining up the edges of the leg openings and matching the ends of the wings. Compare to see if the two sides are gathered to equal lengths. If you notice that one side is more gathered than the other, remove the FOE binding and reapply to match the opposite side, otherwise you will have a diaper that has two different sized leg openings.

Once you have determined that the FOE has been applied and stretched evenly, you may finish the ends. To finish, fold the ends of the FOE to the inside (wrong side) of the diaper.
Stitch straight across the FOE near each end.
Close-up view after stitching.

Trim off excess FOE close to stitching.

Next, zig-zag back and forth over the raw edge of the FOE to prevent any fraying. The FOE will not unravel significantly, however it may get a bit fuzzy in the wash, so the zig-zagging provides a neater finish.

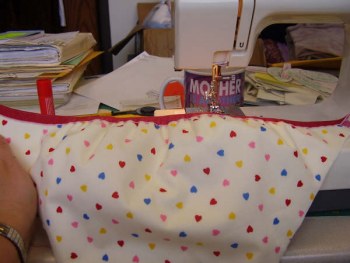
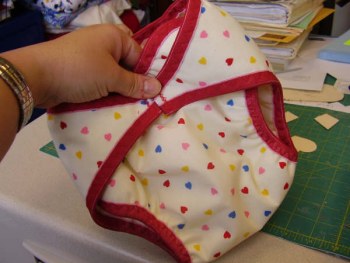
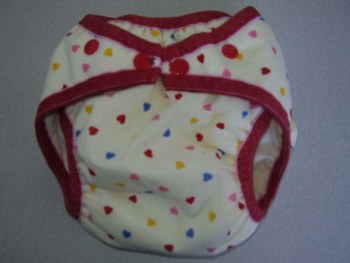
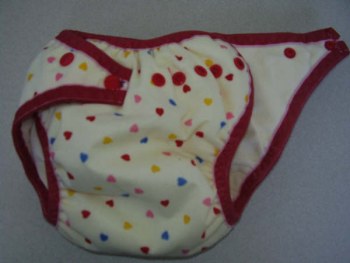
Here is the diaper with the FOE binding finished. Once the snaps are applied it will be ready to wear.
Prior to assembly of the diaper, you should have transferred all markings for snap placement. Marking before construction is more accurate, as it is difficult to mark evenly once the FOE has been applied and the edges gathered. If you have not transferred the markings, carefully do so now.
Snap studs are applied to the back wings with the cap (flat part) facing the outside of the diaper and the stud ("male" part) facing the inside of the diaper.

Snap sockets are applied to the front of the diaper with the cap (flat part) facing the inside of the diaper and the socket ("female" part) facing the outside of the diaper.
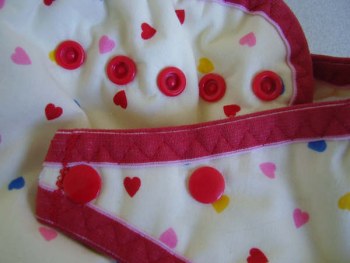
Note: some individuals prefer to "hide" the cap portion of the snap sockets inside the diaper, so that they do show on the diaper inner and do not come into contact with the baby's skin. This option is simple to do, but requires a change in the order of assembly and snap application to the diaper. Please see the tutorial for "Applying Hidden Snaps" if you are interested in learning more about this technique.
Below are photos of the completed diaper.
I hope you have enjoyed this tutorial and found the instructions helpful. I am pleased to be able to offer the Chloe Toes diaper pattern as a fast and easy-to-sew option for cloth diapered babies. I hope you enjoy sewing and using your Chloe Toes diapers.
Here are some other helpful tutorials from Catharine:
And here (pocket trainer w/ FOE):
Pocket Style Training Pants
There is also a free downloadable pattern for a side-snapping diaper cover at the site and there's a tutorial for that too (might be helpful for sewing other patterns too):
Side-Snapping Diaper Cover
And of course, the free pattern:
Free Side-Snaping Diaper Cover Pattern
The pattern takes Adobe Acrobat to download. I also tell everyone that I recommend you make it a little narrower by overlapping the right and left halves by about 1/4"-3/8" when you tape them together to create a full-width pattern. Otherwise it comes out a little too puffy imo.
